

Bracing: what is it all about?
- door Guy D'haenens
- •
- 15 aug, 2017
- •
Just enough to support the top plate - part 1
When you’re into steelstring guitars you may have noticed that nowadays the type of bracing is almost always mentioned in the specifications. So it seems that the type of bracing is quite important to the sound of a guitar. Or not?
Well, let me first explain what bracing is all about. In a next post, I’ll talk about the different types of bracing.
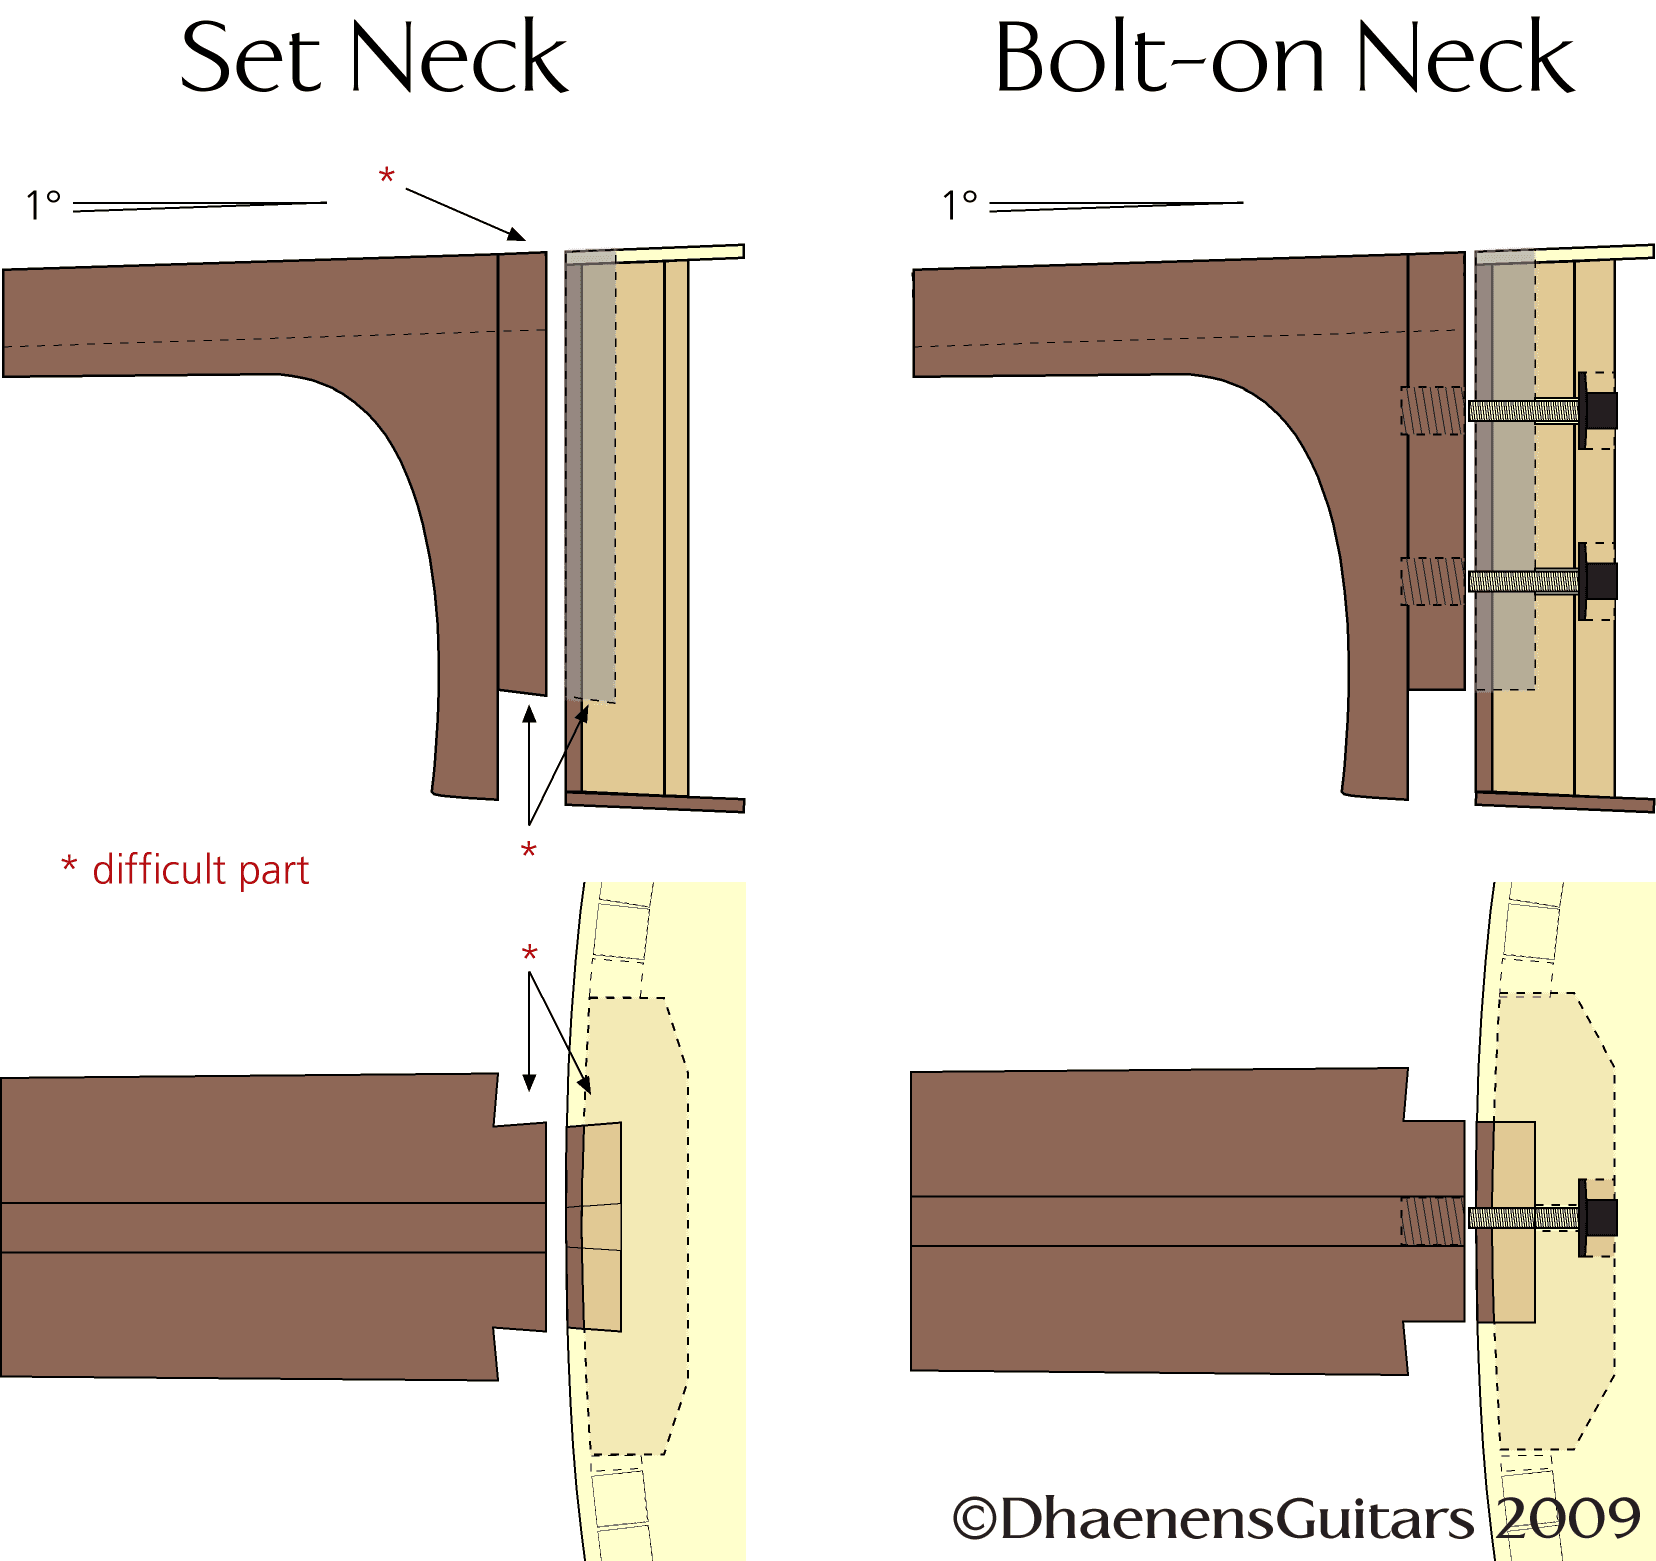
Bracing is the combination of wooden bars glued to the underside of a guitar top to give the top plate enough strength to withstand the enormous amount of pull exerted by the strings. Without bracing, the guitar would get completely deformed once you start tuning the guitar: the area in front of the bridge would be pressed down and the area behind the bridge would get pulled up. Imagine the curves of the letter S. The seam (where the two halves of the top plate are glued together) would last only a couple of hours before opening up. And in case the seam would hold, the top plate would crack on both sides of the seam.
So, the solution is to reinforce the top plate. But how? Adding extra wood to the underside of the top plate changes the way the top plate reacts to the altering tension of the strings. To much wood has a deadening effect to the sound whilst not enough wood will fail to hold the top plate intact. And where should those little bars be placed?
All modern bracing patterns on steelstring guitars are based on the bracing of the early Martin-guitars. C.F. Martin, a German immigrant to the USA, built originally small ‘classical’ guitars. Classical guitars have a very light bracing: 5 to 7 flat wooden strips glued in a fan shape just underneath the bridge. Don’t forget we’re talking about gut strung guitars - nylon wasn’t invented yet - and of guitars that were most of all used in the outback by cowboys.
With the emerge of steel strings (not of the quality we know of today), Martin wanted to put those new gimmicks on his flat-top guitars and had to come up with something more rigid. After a few attempts, he finally settled for an X-shaped pattern of quite massive tall bars. The cross was placed just two inches or so in front of the bridge to counteract the downward pressure of the forward tilting bridge. To prevent the pulling up of the belly (the area behind the bridge), he installed long diagonal bars. On the outer sides of the X he installed small ‘finger braces’ and where the fretboard is glued to the top a fairly massive bar to counteract deformation caused by the fretboard. And it worked. The tone of the guitar was completely different but who cared, it was a different instrument with a different, much louder sound. Those steelstring guitars became rapidly very popular and other guitar builders soon followed.
Sure, there have been guitar builders who tried out other bracing systems - Mario Maccaferri (the ‘inventor’ of the gypsy-style guitar) to name one. And I have to admit, I too tried out a bracing system of my own invention for a while. The sound was great but the belly of my guitars started to deform after a year or so. Now I stick to a variation of Martin’s tried and tested X-bracing.
Frank Ford has a fine collection of photo’s of top-braces on his excellent website.
Now that we have answered the question of where those braces should be placed, we still have to deal with the effect of braces on the sound of a guitar.
Think of a top plate as a massive membrane. The strings put the membrane in motion (up and down, swivelling and tilting) and by doing so, the membrane compresses and expands the volume of air inside the guitar box. And it is this compression/expansion of air that creates sound. In order to get a sound that is both pleasing and full of expression, the membrane must be flexible in multiple but controlled ways. It shouldn’t be floppy but not to rigid either. And it’s in ‘tuning’ this membrane that the real craft shines. The species of wood used for the top plate, for the braces and for the protective strip under the bridge, the thickness of the top plate, the width, the height, the shape and the position of the braces, the thickness of the protective strip and the thickness and shape of the bridge itself, the height of the saddle... everything has to match. And the main problem - or the genius - is that, even with the same procedures, every guitar will have it’s own voice. The differences will be small but obvious to the trained ear. The reason for this is that very, very small differences in amount of moisture, the internal structure of the wood used to create the braces and the top plate, even the type and amount of glue used to hold everything together can result in a slightly different colour of sound.
Every guitar builder has his or her own methods to test if the top plate has the right resonance and flexibility. Most of them, me included, tap the top plate at various positions while holding the top plate between thumb and forefinger right beside the ear. Others test the flexibility by exerting a certain amount of force on the top plate. And those who have access to sophisticated tools use frequency tests. The Kungl Tekniska Högskolan of Sweden published in 2002 a very interesting paper on those tests.
There is no such thing as the golden formula, there are hundreds of formulas, and each guitar builder does his utmost to create the ultimate sound. Some stick to a method that works for them, others try to improve constantly by experimenting. Large guitar building companies have optimised their construction methods to manufacture guitars of a relative constant quality at a high output volume. But don’t be fooled, even factory guitars of the same type and brand can have enormous differences in quality and sound for the reasons mentioned above.
Ultimately, it’s up to you, the guitar player, to keep on searching until you find the guitar with the sound of your dreams.
Guy's Blog

Guitars are designed for the 12-tone equal tempered tuning (12-TET). In a 12-tone equal tempered tuning, an octave is divided in 12 semitones at an equidistance of each other: C, C# or Db, D, D# or Eb, E, F, F# or Gb, G, G# or Ab, A, A# or Bb, B.
12-tone equal tempered tuning assumes that e.g. C# is soundwise exactly in the middle of C and D. As you could have guessed, in real life it’s not, it’s only in the mathematical middle and soudwise a bit on the sharp side.
Guitars and all other instruments are tuned at A4= 440 Hz. In 1939 musicians world-wide came to a consensus on that pitch. Before that time, the pitch had been 435 Hz, 374 Hz (1648) and 503 Hz (1361) but those were merely guidelines. Each maestro was free to compose or direct at a lower or higher pitch.
(Hz is the unit to express the number of oscillations of pressure in a sound wave. 440Hz means that there are 440 oscillations per second.)
When you pull an unfretted A-string on a tuned guitar, you’ll hear 110 Hz. When you fret that string at the 12th fret, you’ll hear 220 Hz. That’s exactly the double. Double or half the Hz of any tone is called an octave. Fret that string at the 24th fret and you’ll hear 440 Hz, again one octave higher or 2 octaves higher than the tone of the unfretted string. What you have done each time, is shorten the string by half. A shorter string vibrates at a higher speed thus producing more oscillations per second. A string at 440 Hz oscillates twice as fast as a string of double that length.
The guitar is fretted so we can easily pick the correct notes. Those frets are laid out according to a simple calculation.
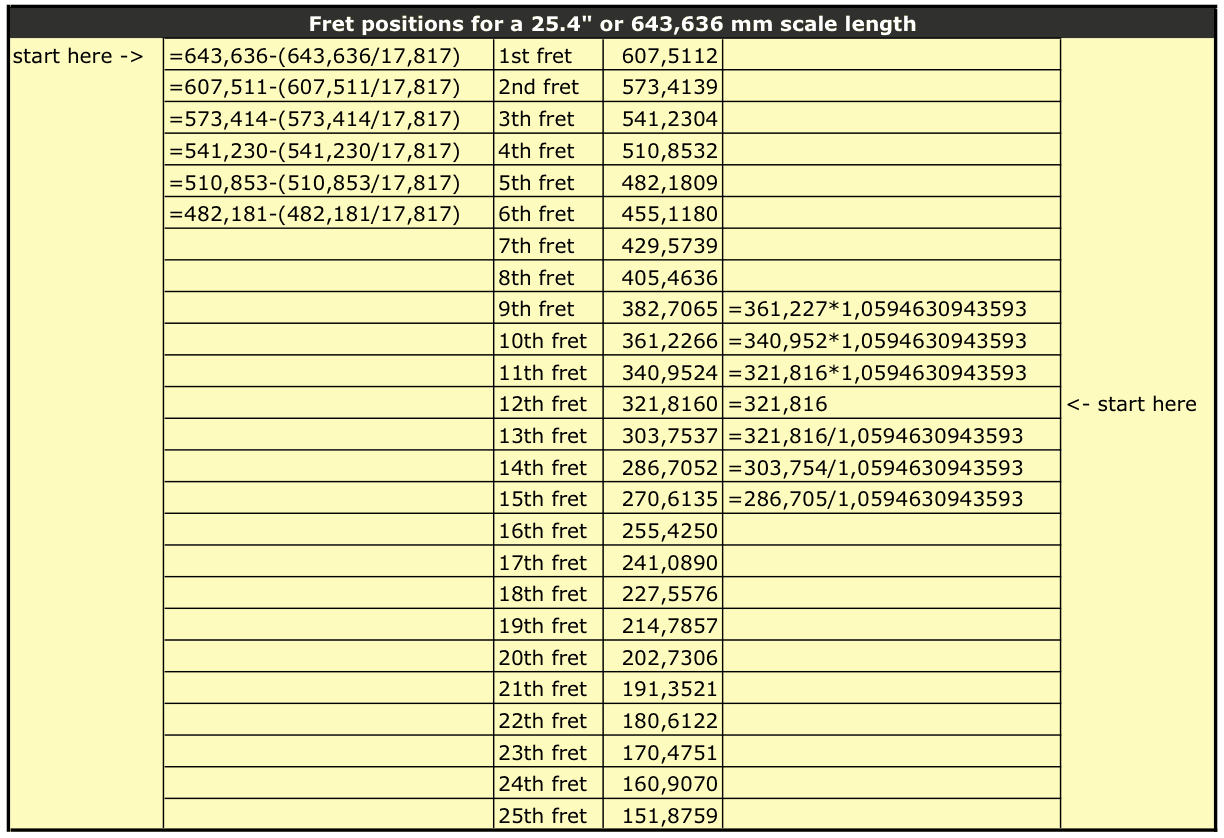
Assume that the scale length of your guitar is 25.4″ (actually it’s 25,34″) or 643,636 mm. The scale length is the distance between the nut and the top of the saddle. The 12th fret will be exactly at 12.7″ (25.4″/2) or 321,818 mm. And since an octave in a 12-TET scale is divided in 12 semitones at equidistance of each other, the math should be fairly simple, no? Alas, dividing 12.7″ by 12 won’t do. That is because we can’t use the distance as input for our calculations, we have to use the frequences. In a 12-TET scale, the ratio of frequencies between two adjacent semitones is the twelfth root of two. And the twelfth root of two is 1.0594630943593.
So starting from the 12th fret, the exact position of the other frets is easily calculated by multiplying or dividing the position of a (previous) fret with 1.0594630943593.
The position of the 11th fret is 340,9543 mm (321,818 * 1,0594630943593); the position of the 10th fret is 361,2626 mm (340,954294100521 * 1,0594630943593); that of the 13th fret is 303,7557 mm (321,818 / 1,0594630943593) and so on.
Another way to determine the fret positions is by using the constant 17.817. The scale length divided by this value gives us the distance from the nut to the first fret.
The following table will make it more clear: