

Braces: regular, parabolic or scalloped?
- door Guy D'haenens
- •
- 13 aug, 2017
- •
Just enough to support the top plate - part 2
In my previous article I referred to the pictures of braces taken by Frank Ford. As you may have noticed, almost all guitar models depicted have scalloped braces. Scalloped braces look neat; it’s almost like one is looking at a modern bridge.
If the big guitar manufacturing companies put them on their tops, then it must be a good thing to do. Or not?
Braces are wooden bars glued to the underside of a guitar top plate. Flat wide bars are very flexible but have little strength while tall small bars are less flexible but possess huge strength. Nylon strings exert only a limited amount of stress on a top plate. So it’s only natural that guitar builders put flat wide bars on a classical guitar. Steel strings on the other hand exert a huge amount of stress on a top plate. Only a top with tall small bars will be able to withstand that kind of stress.
After the braces have been glued to the underside of the top plate, they have to be shaved, scraped and sanded. This is all part of the "tuning" process. The goal is to end up with a strong yet flexible top plate.
In order to give the braces just the amount of flexibility we look for in a well voiced guitar, one can (or use a combination of):
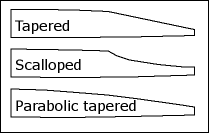
- taper the ends
- use parabolic shaped
braces
- scallop the braces
Taper the ends
A flexible guitar top is a membrane. In order to get a flexible top, braces are tapered or scalloped towards the end. Thinner ends allow the top to vibrate more easily. The amount of taper or scallop is very important. A scallop that is too steep will have little or no effect, too long a scallop will weaken the brace significantly.
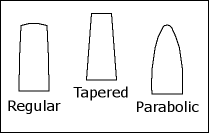
Use parabolic shaped braces
Some guitar builders use regular shaped braces. However, there is a consensus that square or slightly rounded braces deflect the sound waves inside the guitar box. Therefore, parabolic shaped braces are a much better option: the overall strength of the braces is maintained and deflection is reduced to a minimum. It’s a lot of work to fine-tune a top-plate using parabolic shaped braces: the braces have to be shaped in a consistent way after they are glued to the top plate.
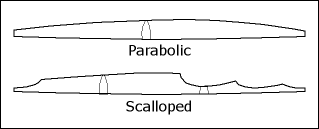
Scallop the braces
The idea behind scalloping is to remove a substantial amount of wood at certain areas from regular shaped or parabolic shaped braces to make the braces more flexible at those areas. Due to that greater flexibility, most guitars with scalloped braces sound louder than those with regular braces. When parabolic shaped braces are scalloped, the scalloped areas become more or less regular again (see figure 3).
In practice
To be honest, I’m not a big fan of scalloped braces. At a certain point, I began to worry about the remaining peaks. Each scalloped area becomes very flexible and will respond easily to the vibrations transmitted by the strings. But after each scallop comes a peak where the top plate is less flexible. Each peak is sort of a dead spot in a pool of vibrations. In my opinion, there’s a substantial risk that a top plate with scalloped braces will favor some frequencies (be over-reactive) while other frequencies will be lost or reduced. I don’t say it’s impossible to build a (good) guitar that is evenly responsive to all frequencies using scalloped braces; but I think that a top with well dimensioned parabolic shaped braces is more likely to have a uniform and clear voice.
If you took the time to have a look at the paper on acoustics by the Kungl Tekniska Högskolan of Sweden I talked about last time, you may have noticed the strange patterns the dust particles formed when a top plate was exposed to different frequencies. It would be interesting to perform the same tests for top plates with scalloped braces.
Once a guitar box is assembled, the shape of the braces can only be slightly modified using a piece of sandpaper. It’s tedious and difficult as one has to operate through the soundhole. Greater effect on flexibility and sound can be obtained by making the tops thinner around the edges on the outside. Violin makers put a tiny groove around the edge to enhance flexibility, careful not to cut too deep. It is interesting to know that the Breedlove company also cuts a tiny groove at the inside. I haven’t tested any of their instruments lately but that groove might do the trick.
A word of caution: use light-gauge or medium-light-gauge strings only on a guitar with scalloped braces. If you put heavy-gauge strings on such a guitar you will definitely ruin it in a very short time.
Guy's Blog

Guitars are designed for the 12-tone equal tempered tuning (12-TET). In a 12-tone equal tempered tuning, an octave is divided in 12 semitones at an equidistance of each other: C, C# or Db, D, D# or Eb, E, F, F# or Gb, G, G# or Ab, A, A# or Bb, B.
12-tone equal tempered tuning assumes that e.g. C# is soundwise exactly in the middle of C and D. As you could have guessed, in real life it’s not, it’s only in the mathematical middle and soudwise a bit on the sharp side.
Guitars and all other instruments are tuned at A4= 440 Hz. In 1939 musicians world-wide came to a consensus on that pitch. Before that time, the pitch had been 435 Hz, 374 Hz (1648) and 503 Hz (1361) but those were merely guidelines. Each maestro was free to compose or direct at a lower or higher pitch.
(Hz is the unit to express the number of oscillations of pressure in a sound wave. 440Hz means that there are 440 oscillations per second.)
When you pull an unfretted A-string on a tuned guitar, you’ll hear 110 Hz. When you fret that string at the 12th fret, you’ll hear 220 Hz. That’s exactly the double. Double or half the Hz of any tone is called an octave. Fret that string at the 24th fret and you’ll hear 440 Hz, again one octave higher or 2 octaves higher than the tone of the unfretted string. What you have done each time, is shorten the string by half. A shorter string vibrates at a higher speed thus producing more oscillations per second. A string at 440 Hz oscillates twice as fast as a string of double that length.
The guitar is fretted so we can easily pick the correct notes. Those frets are laid out according to a simple calculation.
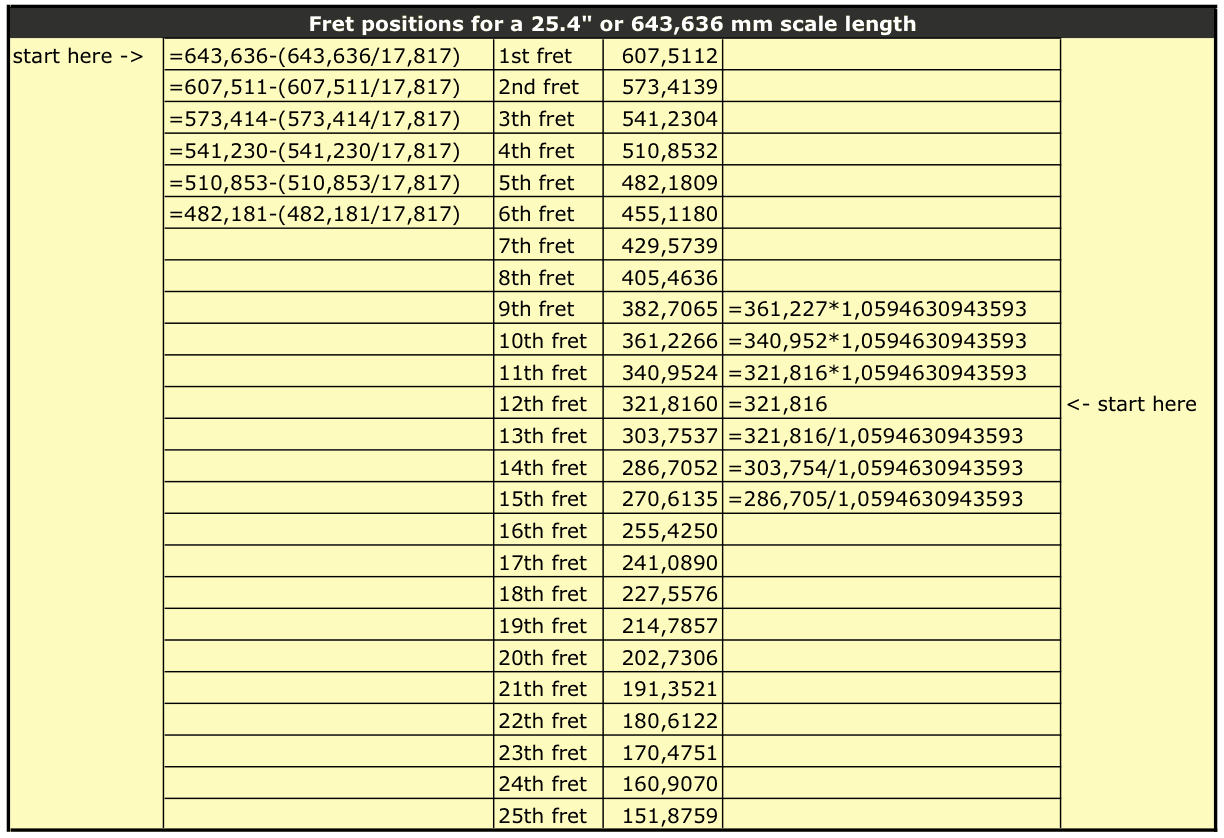
Assume that the scale length of your guitar is 25.4″ (actually it’s 25,34″) or 643,636 mm. The scale length is the distance between the nut and the top of the saddle. The 12th fret will be exactly at 12.7″ (25.4″/2) or 321,818 mm. And since an octave in a 12-TET scale is divided in 12 semitones at equidistance of each other, the math should be fairly simple, no? Alas, dividing 12.7″ by 12 won’t do. That is because we can’t use the distance as input for our calculations, we have to use the frequences. In a 12-TET scale, the ratio of frequencies between two adjacent semitones is the twelfth root of two. And the twelfth root of two is 1.0594630943593.
So starting from the 12th fret, the exact position of the other frets is easily calculated by multiplying or dividing the position of a (previous) fret with 1.0594630943593.
The position of the 11th fret is 340,9543 mm (321,818 * 1,0594630943593); the position of the 10th fret is 361,2626 mm (340,954294100521 * 1,0594630943593); that of the 13th fret is 303,7557 mm (321,818 / 1,0594630943593) and so on.
Another way to determine the fret positions is by using the constant 17.817. The scale length divided by this value gives us the distance from the nut to the first fret.
The following table will make it more clear: